I have a confession to make: I used to hate composting. The smell, the mess, and the endless waiting. These days, things have changed.
I use now the three-bay composting system, which is the most efficient way of producing a lifetime of compost. I found this method on YouTube so I decided to give it a try. I will cover all the information in this article so stay tuned.
Problem is – over time, the pallets I used to create the bays become dilapidated, and grass and weeds grow through the gaps, making them less effective.
In this post, I’ll discuss everything you need to know about this amazing system, as well as how to upgrade your compost piles for better sustainability.
Quick Overview
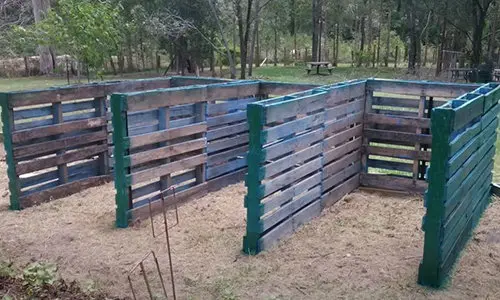
The three-bay composting system has three bays, as the name implies. The first bay is where you add all your green waste.
Once the pile has decomposed to about a foot high, you turn it over into the second bay, where it continues to break down.
The third bay is where you put the finished compost. All three bays are essential to keep the process going without interruption.
Items Needed
Wooden pallets, screws, shovel, wheelbarrow, recycled plastic lining, drill, old gym mat, green waste, and cow manure. You can use old signage or metal trays if you don’t have a gym mat.
For those not familiar with the three-bay composting system, continue reading. Most are square, but we made ours rectangle to fit more in there.
Related: The Ultimate Guide To Composting
The First Bay
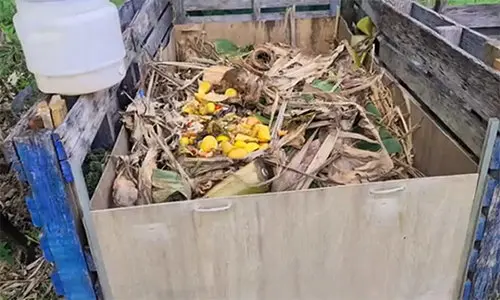
This bay is the first stage of compost-making. It’s where you dump your green waste, such as grass clippings, fruit and vegetable scraps, leaves, and other organic materials.
The more organic waste you put in this bay, the hotter the pile will become. The heat generated by the stack will speed up the composting process. Leave that compost for several months until you see the first bay’s contents compacted to about a foot or less, indicating that it has been composted.
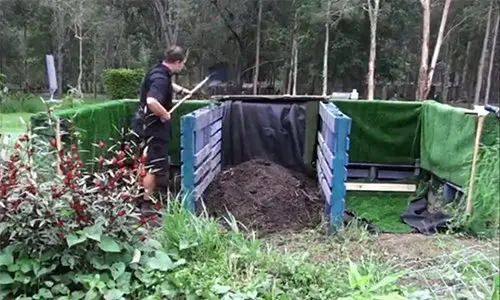
Next, take the top layer that hasn’t broken down yet and put it into the second bay.
The Second Bay
In this bay, the composting process will continue, and the contents will become ready for use in the garden. Once the second bay’s contents are entirely composted, transfer them to the final bay.
The Third Bay
This bay is where you store the finished compost. You know it’s ready to use when it has a crumbly texture, smells, and looks like soil.
After emptying the first or second bay, you should start filling them up again to keep the process going, which is the basic principle of the three-bay composting system.
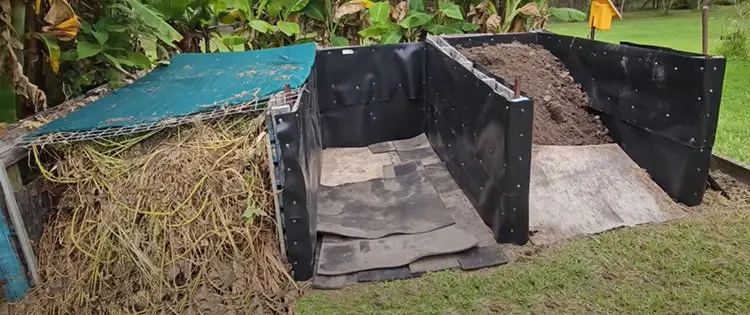
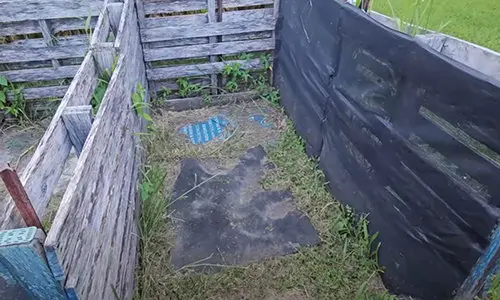
It’s also essential to maintain the bays to ensure they function optimally. Grass and weeds can grow through the gaps in the bays, affecting the composting process. That’s why we came up with an ingenious solution to this problem.
We decided to use a plastic lining to line the bays, which will help prevent grass and weeds from growing through the gaps and keep the composting process running smoothly.
Related: How to Adjust the pH in Soil and Water for Abundant Harvests
Upgrading Your Three Bay Compost Piles
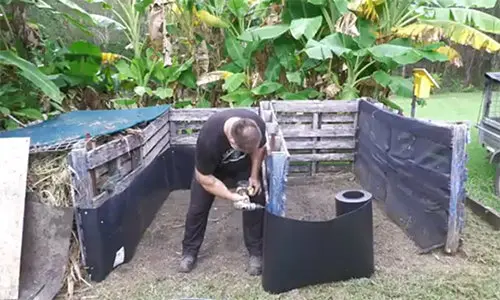
Now, let’s talk about how to upgrade your three-bay compost piles, so you can have these for a long time. The first step is to assess the state of your pallets. If they’re worn and falling apart, it’s time to replace them.
You can use new pallets or recycled ones. If you’re using recycled pallets, ensure they’re clean and free of harmful chemicals that could contaminate your compost.
The next step is to cover the inside of each bay with a plastic lining. That will prevent grass and weeds from growing through the gaps and losing compost in those areas.
Tack the lining onto the inside of each bay securely so it doesn’t move around when you’re turning the compost. Some might wrongly think the plastic lining will prevent airflow or encourage anaerobic activity on the pile due to a lack of oxygen.
That’s false because too much airflow makes the compost pile take longer to break down. If you have a bay system similar to the one above, with open fronts and tops, there’ll be plenty enough airflow and oxygen.
The mix of ingredients is mostly the ones that dictate how the pile breaks down. Even if your pile goes putrid and slimy, you can correct it by adding more carbon, but the truth is, if left alone long enough, it’ll eventually turn into valuable compost.
Give the bays a tidy-up and whipper snip. Remove any grass and weeds that have grown around the bays.
Finally, place some gym mats or old signage on the bay floor, then spread a bit of cow manure around the third bay.
Cow manure is an excellent soil conditioner that adds nitrogen to the soil and feeds the microbes that break down the compost.
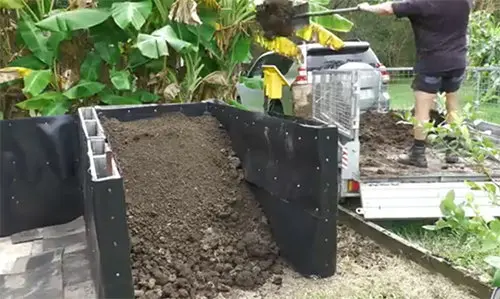
Make sure you keep your piles away from the house so if you don’t get the mix right, the stink won’t bother you.
The bottom line is: making compost is easy. Following the steps outlined today, you can produce nutrient-rich compost for your garden while reducing your carbon footprint. Remember to maintain your compost bays and consider using recycled materials to make them more stronger and resilient. Happy composting!
About The Project
Mark Valencia retired from the Australian Army in 2008 after 21 years of service, and now he writes articles on his blog.
This topic first appeared on Mark’s YouTube Channel, where he is now enjoying the opportunity to communicate this passion. It’s also about lifestyle and self-fulfillment by looking after our health (physical/mental) through exercise and “slowing life down a little.”
You may also like:
 Boost Your Soil Quality With This Compost
Cheap and Easy to Build Root Cellar in Your Own Back Yard (Video)
You Should Avoid Having This On Your Property, Unless…
7 Projects That Turn You Into A Self-Sufficient Homesteader
How to Make the Most of Harvest Time During the Food Crisis


What a great idea! We’re getting ready to replace our rotting wood pallet composter, so this is very timely.
Question: What is the purpose of the metal/gym mat floor?
My guess would be the mat/metal floor let’s you know you’ve reached bottom so when it’s clean out time, you aren’t excavating a little soil away each time. As well, it would possibly help retain nutrients so they aren’t being leached away with rains. Good question!