Most people think a deep freezer is the key to long-term food storage, but what happens when the power goes out?
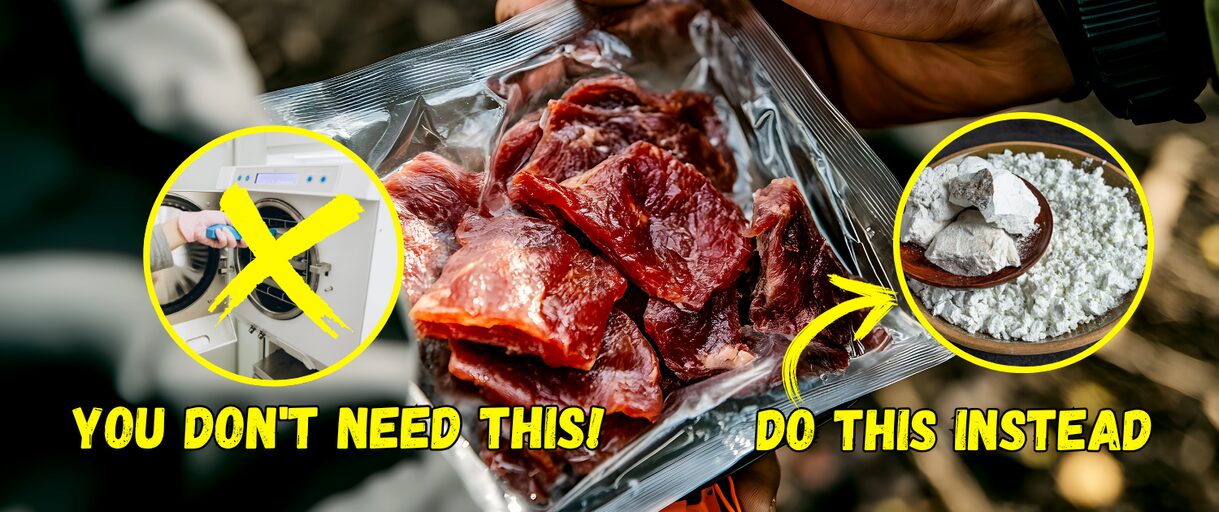
There’s a reason pioneers and survivalists alike have turned to freeze-drying. It locks in flavor, nutrients, and freshness for over a decade without needing constant electricity. And you don’t even need a $3,000 machine to do it. With a few clever tricks, you can create lightweight, shelf-stable meals right in your own kitchen that last 10+ years and taste just as good as the day you made them.
Why Freeze-Drying?
When I chose the off-grid life, food was the one thing I struggled with the most. No, it wasn’t that I didn’t have enough harvest around me. The problem was that I had no idea about how to properly store the yield so it could last long. The result? Half of my hard-earned harvest would just go stale in front of my eyes.
However, one day a fellow homesteader showed me how freeze-drying can help you store food for more than 10 years. And after learning all the ways, my farmsteading life has never been the same. To make your life easier, I will be passing all this wisdom on to you in this guide. Ensure to follow each and every point carefully so you have nutritious yet delicious food all year.
Freeze Food With Salt-Ice Mixture
I first learned about salt preservation from the Amish Ways book. Honestly, I wish more people knew about it; it’s a game-changer for any homesteader.
For the first time ever, this 200-year-old wisdom is available in a beautifully made hardcover edition, authored by Eddie Swartzentruber, a man who spent 16 years living within the Amish community and learning their way of life first-hand. You can grab your own copy today and claim 3 FREE BONUSES using my exclusive 76% discount coupon right here.

Inspired by that, I figured out how to use salt and ice in a cooler to freeze-dry food quickly and easily.
Salt, ice, and a cooler can also help you freeze-dry edibles the quickest way. This old-school trick always worked for my pioneers, and I am sure you will also find it effective. The process is simple, you just have to:
- Line a cooler with reflective sheets or aluminium foil to trap the cold inside.
- Stack a good amount of ice cubes inside the cooler and sprinkle a generous amount of coarse rock salt all over it. Salt will lower the temperature of your ice and have the cooler turn into a mini freezer.
- Now freeze the food you want to freeze-dry. Once frozen, spread it on a rack and place the dish directly above the salty ice. Do not have the food touch the ice directly, or else you’ll end up with a soggy mess.
- Close the lid and wait for a few days to have the moisture from the food sublimate away.
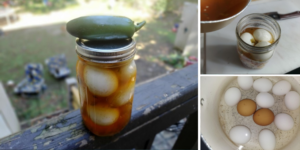
Ice-Cooled Vacuum Jar System
If you have a set of large mason jars and a hand pump, you can make a small-batch freeze dryer right in your kitchen. Start by freezing thin slices of food, then place them inside a mason jar with a layer of ice or dry ice underneath in a separate small dish.
Attach a vacuum lid and pump out as much air as possible. The ice inside absorbs the sublimated moisture as the food dries over several days. Swap out the ice as needed until the food becomes dry and crisp. Once sealed in Mylar with oxygen absorbers, this method can preserve food for 10+ years.
Convert a Chest Freezer Into a DIY Freeze Dryer

Don’t want to break the bank by purchasing a home freeze-dryer machine? Don’t worry, we have got a DIY version for you which is cheap, effective, and sustainable in all ways. To begin, you need to:
- Purchase an old chest freezer or maybe grab the one freezer unit that has been sitting idle in your attic.
- Now, pair this freezer with a simple vacuum, or a much more sustainable option, install a manual vacuum pump on top of this chest. This gadget will pull out all the moisture from the food while keeping it frozen.
- Once the food is freeze-dried, store it in Mylar bags to have it last for more than a decade.
Dry Ice Method
If you want to freeze-dry a small batch of food, then dry ice may be a good low-tech option to try out. Here’s a step-by-step guide on how to carry out this process:
- Step 1: Find a sturdy cooler and layer it with dry ice. Ensure you use gloves before starting the layering process.
- Step 2: Freeze the food you want to freeze-dry in a freezer or snow pits outdoors if you live in a cold area.
- Step 3: Once the food is frozen, place it inside the cooler lined with dry ice. Close the lid of the cooler and let this food stay inside for at least 48 hours to freeze-dry completely. Ensure not to secure the lid too tightly to allow carbon dioxide gas to escape. Also, don’t let the edibles come in direct contact with dry ice.
- Step 4: When all the moisture is absorbed, the food is freeze-dried and is ready to store.
Freeze-Dry Food Outdoors
For those living in areas where the temperature stays below freezing throughout winter, you have nature’s freeze dryer right outside your door. And you don’t have to do the hard work. Simply slice the veggies or fruits, lay them on clean racks, and place them outdoors where animals won’t invade. Just after a day or two, your food will be completely freeze-dried without any hassle.
Hang-Dry Frozen Herbs in Freezing Air
Want to preserve herbs for when they are not in season? Freeze-dry them naturally, and you will be good to go.

And you don’t need any kind of equipment or any other DIY project. Grab a stash of freshly picked herbs and hang them on your porch or in your shed where the chilled air flows easily. This method will work more effectively if you’re living in a colder climate region.
Make sure you stock up on both food and medicinal seeds. This way, when everyone pays for antibiotics in gold, you’ll have them growing in your backyard. This crisis-proof seed pack contains one plant for every part of your body – you’ll find a painkiller, an anti-inflammatory, an anti-parasitic, and even some plants that can help people with diabetes and autoimmune disorders.
Utilise Frozen Evaporation With a Fan
Another easy way to dry freeze foods is by utilising frozen evaporation with a fan. The process is simple. You need to slice the food you want to freeze-dry, berries, herbs, or sliced veggies, whatever you like and freeze them on a wire rack.
When the edibles are frozen solid, place this rack in a room where the temperature stays low. Now, install a fan in this same room to keep the air moving and let the moisture out from the food. After a few days, when the food becomes dry and crisp, store it in airtight bags.
Evaporative Freezing with Alcohol Bath

For those who like to experiment, a simple alcohol bath setup can accelerate sublimation. Freeze your food solid and place it on a wire rack inside a sealed container. Under the rack, put a shallow dish filled with high-proof alcohol (like 190-proof Everclear) and a handful of rock salt.
The alcohol/salt combo keeps the air in the container extremely cold while also drying it out, pulling moisture from the food without thawing it. This creates a homemade freeze-dry effect over a week or two and works particularly well for fruits and cooked meats.
Off-Grid Alpine Bag Drying
Mountaineers and polar explorers have long used a trick that works for homesteaders too. Freeze your food and pack it into breathable cloth bags (like canvas). Hang these in a place with fluctuating temperatures slightly below freezing during the day and night (such as an unheated shed in winter). The natural temperature swings create a pressure difference that speeds up sublimation. After a couple of weeks, the food will turn light and crisp. Stored in Mylar with oxygen absorbers, this method can keep food shelf-stable for a decade or more.
Charcoal-Pit Cold Drying
You can make a DIY “cold sink” that keeps food at low temperatures even in summer. Dig a small pit and line it with charcoal to absorb moisture. Place frozen food on a mesh rack inside and cover with a breathable lid (like burlap). The ground keeps it cooler than ambient air, while the charcoal maintains low humidity, allowing moisture to sublimate out of the food. Sealed properly afterward, this can give you long shelf life without any refrigeration.
If you want to learn how to preserve food for decades for pennies on the dollar, all you need to do is learn from the only people who have been living without electricity, toxin-ridden foods and modern conveniences for all their life. Here, you’ll get access to several never-before-seen videos where you can see:
- The deadly canning mistake the Amish never make (but most Americans do… without even realizing it)
- Why the Amish put this single leaf in their flour
- How they make powdered eggs
- How they store eggs for over a year—without a fridge, vacuum sealer, or added chemicals
And that’s barely scratching the surface of what these videos will reveal. They’re made by a former Amish who has been excommunicated for sharing these secrets with the outside world. So try and check them out before the videos get taken down!
Final Thoughts
If there’s one thing I’ve learned from living off the grid, it’s that a good harvest is only half the story. How you keep this yield in the long run is what really counts. These freeze-drying tricks have saved my pantry more times than I can count, and I hope they do the same for you. Pick the method that fits your setup best, and trust the process.
Inside A Navy SEAL’s Bug-In Guide, you will discover exactly how to build a long-lasting stockpile that needs no refrigeration. It starts with a complete stockpile that you can eat from morning, lunch, and dinner for three months. Then you’ll have another one for six months and another for a full year.
You’ll see exactly where to buy these foods so they’re as affordable as possible. You’re also going to get a day-by-day and meal-by-meal rationing plan to make sure you are not only getting around 2,200 calories a day but also the vital protein, fat, and other nutrients that will keep you healthy in the long run.
Besides what I’ve mentioned so far, here are some other things you’ll find inside:
- The Under $1 Walmart Canned Goods You Absolutely Need to Add to Your Food Reserves
- A Meal in a Jar That Can Feed You for a Week
- How to Make the Ultimate Survival Food with a 25-Year Shelf Life
- The Only Seeds You Need to Stockpile for a Crisis
- What Item You Should Remove from Your Pantry Immediately
- How to Hide That You Still Have Power Left in a Blackout
- What Great Depression Foods We’ll Be Eating Again Soon
- How to Use a Car Battery to Power Up Your Radios
- What Happens if You Take Expired Medications
And so much more!
The author has printed only a limited batch of copies this time, and once they’re gone, they’re gone for good. You can access my personal discount from the button above!
You may also like:
Can You Freeze Eggs? What Every Homesteader Should Know
How to Get 295 Pounds of Extra Food for Just $5 a Week (Video)
How to Store Bacon So It Lasts for Years
Forgotten Ways People Used to Store Food Before Refrigerators


