It’s inevitable that harvest season is always going to provide us with way more fruits, vegetables and herbs than we can use in a week let alone months or maybe even years. This is especially true for herbs, spices and grains.
The hard part is often figuring out how to not only sufficiently dry them but how to store them and where. Even the best preservation methods can fail with improper storage locations, temperature extremes and the most common enemy – moisture.
Some of the techniques are simple. Some a bit more complicated. All of them can give you year after year success if you remember some basic principles.
Effectively Drying Your Plants
 The ancient method for drying any plant was sun drying. It still works but it helps if you remember some common challenges. One challenge is insects. They’re bad enough in the garden but just because you’ve picked them doesn’t mean they’ll stay away.
Another sun drying challenge is moisture. It can come from morning dew, rain, even condensation in your drying box or area.
Finally, there’s a challenge that shows up with all drying methods. Insufficient drying. Your dried plants should be crispy not leathery. Seeds or grains should be hard, not soft. Flower tops and petals should be brittle not flexible.
Effectively Packaging Your Plants
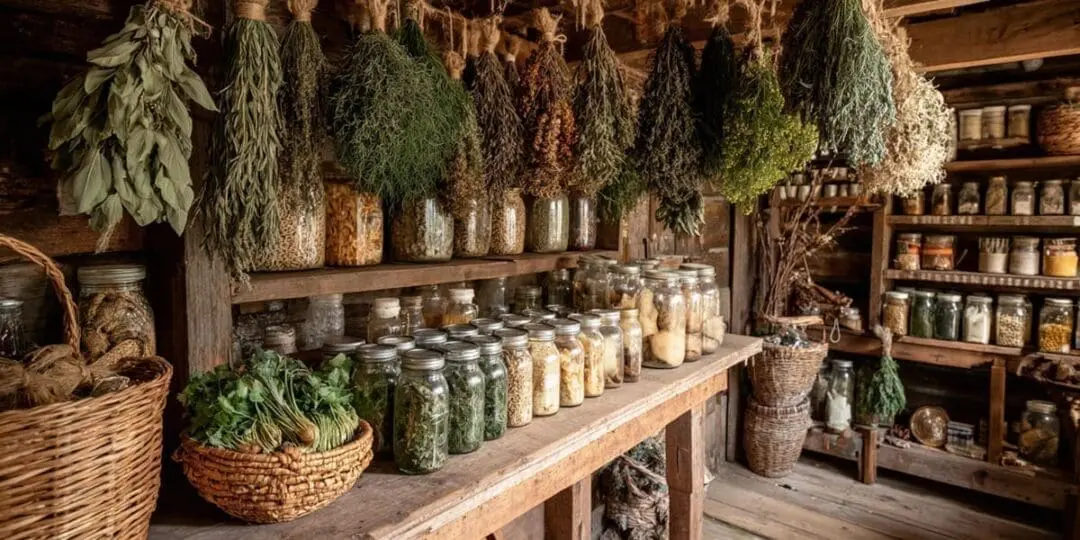
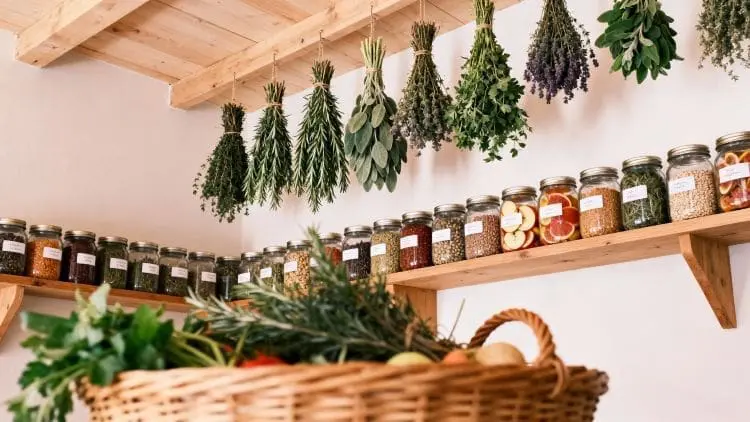
It’s not always necessary to package a dry plant. We’ll explore that more when we hang dried bundles of herbs from rafters in an attic. But as a general rule, some degree of packaging protects your dried plants better for the long-term, especially when we’re measuring shelf-lives in years.
Just as important is labeling and dating your packages. Don’t assume you’ll remember what it is and always indicate the date it was packaged.
Proper Storage Practices
Moisture is the number one fail point for dried plants but temperature extremes can also take their toll. High heat is worse than deep cold but fluctuations between both can actually cause plants to crumble to dust. That’s not a problem if a powder or dust is your goal, but dry oregano leaves always look better and taste better than oregano dust.
Plants You Can Dry
Some plants aren’t just meant to be dried. Think of lettuce and spinach. When was the last time you saw dried lettuce or spinach in a store? It’s a good bet that if no one is supplying it there’s little demand for it.
On the other hand, dried seaweed is quite popular. Most herbs are sold dried, as well as spices, onions, peppers, mushrooms, celery, carrots and many fruits from apricots to grapes (raisins), bananas, apples and the list goes on. Here’s our short list of plants you can dry and then we’ll get into specific drying techniques and most importantly, storage for each.
- Herbs including rosemary, parsley, sage, thyme, oregano, basil and chives
- Vegetables including onions, garlic, mushrooms, carrots, tomatoes and pepper
- Fruits including blueberries, strawberries, bananas, apples, apricots, plums and grapes
Learn the Old-World Food Preservation Methods That Still Work Today
Long before electric dehydrators, plastic bags, or climate-controlled pantries, the Amish preserved food year after year with almost zero waste. Their methods weren’t based on convenience—they were built around reliability, simplicity, and long-term survival. The Amish Ways Book reveals how traditional families preserved herbs, grains, vegetables, and fruits using techniques that still outperform many modern shortcuts.
Inside, you’ll discover:
- How Amish households dry and store food without relying on electricity
- Traditional storage locations that naturally protect against moisture and heat
- Old-world techniques for preserving flavor, texture, and nutrition
- Why simplicity often beats modern “high-tech” food storage methods
- How to build a pantry that lasts through hard seasons and uncertainty
If you want preservation methods that have survived generations (not trends) this book shows you how it’s been done successfully for centuries.
Plant Drying Techniques
 We’re going to cover 4 basic approaches to drying plants.
Which approach you use depends on your situation and available supplies.
Sun Drying
There’s more to sun-drying than just putting plants in the sun. The ideal set up is a shallow box line with aluminum foil with air vents cut in the sides and a sheet of glass or plexiglass on top.
The plants (Leaves, stalks, seeds, flowers) are placed inside the box and covered and then set up facing the sun. It will take 2 to 4 days for things to dry depending on the weather and ambient temperature. Bring it indoors in case of rain. Check the plants from time to time and turn or toss things around to make sure all parts are equally exposed to the heat and circulating air.
Air Drying
This is another ancient technique. Bundles of plants stalks are hung from a rope or a rafter in an attic or from a branch or other support and exposed to the air. An attic works great because it tends to concentrate hot, dry heat.
Check the bundles from time to time and when dry you can either leave them there or package them for further storage.
Food Dehydrator
A food dehydrator makes short work of drying everything from leaves to seeds to flowers and is best for chopped vegetables and whole fruits like apricots.
You’ll have to experiment a bit with temperature settings and times. Leaves may only require hours while fruits and vegetables may require a day or two. Check things as you go and don’t forget to turn, toss and move your plants around as the dehydration progresses.
Oven Drying
If all else fails, a conventional oven set at 100 degrees F. (38 degrees C.).
Place the plants on a baking sheet and once again, toss and turn as you go. Timing will vary so turn on the oven light and check the plants as they dry. And remember, you want things crisp and hard, not leathery although fruits like apricots, plums and grapes will have some softness like you would see with prunes, raisins and dried apricots.
Best Packaging Options for Dried Plants
 There are numerous possibilities for packaging. Some work better than others, and one is the absolute best if you want to preserve your dried plants for years.
√ Hanging Bundles
This may be the oldest method for preserving dried plants. Bundles of herbs or braided ropes of onions or garlic are suspended in a location that is dry and has a consistent temperature with low humidity. The bundles will keep a long time, but the downside is that any dust or particles in the air will eventually coat the dried plants.
√ Jars
Mason jars are an excellent option but even an empty pickle jar and lid that has been rinsed and dried can work. Jars work for everything from dried leaves to flowers, seeds and even diced and dried vegetables or dried fruits.
Store them in a cool, dark place. A basement cupboard or cabinet is ideal sue to the steady temperatures you usually find in a basement. A root cellar also works. The one telegram is to avoid temperature fluctuations and sunlight. That will eventually degrade the plants.
√ Plastic or Mylar Bags
Plastic bags can work and Mylar bags are better. Mylar blocks light from entering but a dark storage space will compensate. You could also freeze the bags to extend shelf-life.
√ Vacuum Sealing (The Best)
Vacuum sealing dried plants in Mylar bags is the best way to preserve dried leaves, seeds, flowers and diced and dried vegetables. The seal is airtight cutting off oxygen and moisture which are the two primary causes for spoilage and mold. Remember to identify and date the contents and they will easily keep for years if stored properly.
Related: Build A Perfect Root Cellar That Lasts 100 Years!
Why Proper Storage of Dried Plants is Most Important
 Regardless of how you dry or package your plants, three factors affect long-term food storage:
Moisture or Humidity
Unless your dried plants are hermetically sealed in moisture proof packages they will be subject to moisture and humidity. Mold growth can easily follow, and everything will be unsafe to consume.
Temperature (especially temperature fluctuations)
Cold temperatures are best from freezing to refrigeration. Higher temperatures can be okay if the packages are sealed. It’s temperature fluctuations from cold to hot that do the most damage. Find a space with a consistent temperature and low moisture levels. Attic spaces are a possibility or dry basements. Cupboards and pantries work fine as long as they are enclosed in darkness. A root cellar could also work but avoid sheds, barns and garages. Temperatures fluctuate as well as humidity levels.
Light (particularly direct sunlight)
The problem with direct sunlight is the ultraviolet or UV light from the sun. It will quickly compromise the flavor and texture of your dried leaves, seeds, flowers and fruits or vegetables. Opaques packages like Mylar bags can help but clear jars or plastic bags are at the mercy of UV light. Don’t store your dried plants on a shelf or location that might receive direct sunlight at any time of day.
Go Beyond Drying – Learn How to Preserve Plants for Healing and Medicine
Drying plants is only the first step. Knowing which plants to dry, how long they remain potent, and how to store them for medicinal use is an entirely different skillset, one that most modern guides ignore.

Forgotten Home Apothecary teaches you how to properly preserve herbs not just as food, but as powerful natural remedies that can remain effective for years when stored correctly.
This guide shows you:
- Which dried herbs retain medicinal strength long-term—and which don’t
- How improper storage destroys healing compounds even when plants look “fine”
- Traditional methods for storing medicinal herbs safely and effectively
- How to build a home apothecary using plants you already grow or forage
- Why dried herbs were once considered essential household insurance
If you’re already drying plants, this guide helps you turn stored herbs into real long-term value, not just pantry clutter.
Don’t Get Complacent About Food Storage
Check your inventory from time to time and take note of the dates on the packages. It’s easy to forget when or what was stored and checking your storage at least once a month is a good idea.
Whenever opening a package after a long time, observe it, smell it and taste it. If anything seems off from its appearance to smell to taste -toss it. If you dry your plants properly, package them appropriately and store them safely you should be able to keep a variety of dried plants in storage for years.
You may also like: 
7 Herbs To Plant In Your Survival Garden
DIY Amish Cough Syrup (Video)
The Best Time to Water Plants: A Natural Grower’s Guide
Don’t Throw Away SPOILED Vegetables! Do THIS Instead!


