During the Great Depression, when hunger was constant and every crumb counted, families relied on a biscuit that refused to fail them. This fireproof, nearly indestructible biscuit wasn’t just food. It was survival in a bite.
Made from simple ingredients, this biscuit could last for years without spoiling and resist even the harshest conditions. Tough enough to withstand fire, rumored to stop bullets, and even tested for radiation shielding, it became a lifeline on homesteads and in pantries when nothing else could be trusted.
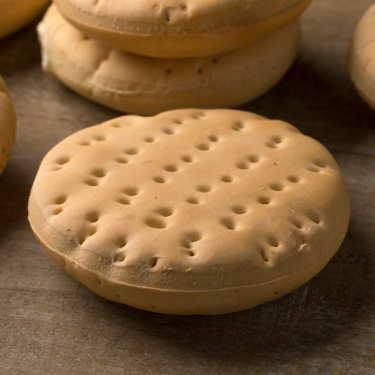
What Is Tinderbread?
A snack as hard as a rock, but it gets soft whenever dipped or sauted, is what we call a tinderbread. Or this is at least what our pioneers used to say about it. Even today, you might notice many homesteaders still relying on this snack. The reason? It is easy to make, is full of nutrition, and can last just literally forever.
Living off the grid means you don’t always get to have savoury food available. There can be instances when you are craving salty or sweet biscuits. In such instances, if you know how to bake tinderbread, you will be sorted well.
Tinderbread Through History
Besides our farming ancestors, our war-going heroes also used to have tinderbread in their ration packs. Because they were not prone to spoiling or getting crushed, these biscuits would last them very long on battlefields. And even after months and years of storage, this tinderbread would still be fit to eat regardless of the condition they were stored in.
Additionally, sailors or cowboys who used to sail for months would also rely on this supplement. Their families would bake them a batch of tinderbread whenever they set out to trade, so they had something to eat when food wasn’t available.
The Secret Behind Tinderbread’s Long-Lasting Shelf Life
Today, we have many other biscuits and breads readily available in the market, but still they don’t last longer than a week. However, tinderbread stays fresh for as long as you want it to be. This is due to:
Zero Amount of Fats
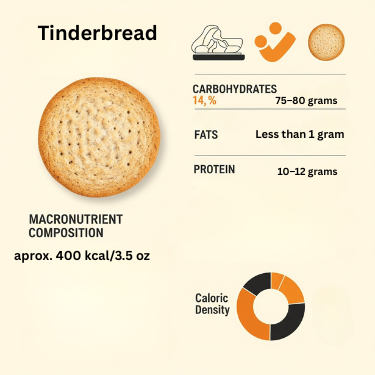
Modern snacks come with lots of fats and oils, which increases their chances of turning rancid over time. However, tinderbread contains no such amounts of oils, tallow, or butter. As a result, it can last longer and remain safe to eat even after they have been stored for months.
Controlled Moisture Content
Remember how I told you, tinderbread is very hard to eat? This is because it is baked at high temperatures until the moisture evaporates. As a result, the chances of bacteria or mold growing over them become zero as these microorganisms require moisture to thrive. So, you can store them in jars and forget about them for months, but still won’t spot a single sign of spoilage.
Natural Ingredients
Tinderbread sticks to the basics: just flour, water, and a pinch of salt. There are no preservatives, yet its simplicity is the ultimate preservation method. No hidden sugars or dairy products means nothing can rot.
Step-by-Step Guide to Making Tinderbread on Your Homestead
Baking tinderbread doesn’t require you to have top-notch cooking skills or even high-end ingredients. The process is simple and to the point! Here’s how our pioneers used to do tinderbreads.
Ingredients
2 cups all-purpose flour
Half a teaspoon of salt
One and a half cups of water
Recipe
Step 1: Preheat the Oven
Before you begin, preheat the oven or wood stove to about 350 degrees Fahrenheit.

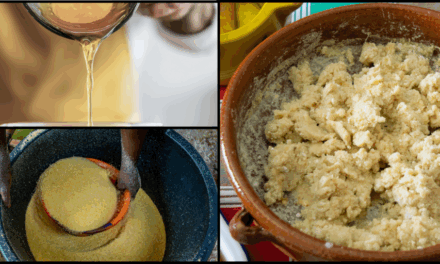
Step 2: Prepare Dough
Now, take a bowl and mix the flour and salt into it. Ensure to mix both ingredients thoroughly before pouring water. Start adding water slowly and gradually while stirring the mixture with the help of a ladle. Once you notice the dough has become stiff, start kneading it with your hands. Ensure the finalised dough isn’t sticky, as you will be kneading it afterwards.
Step 3: Get the Dough Ready to Bake
Sprinkle flour on a kitchen top and roll out the dough evenly on top of it. Using a rolling pin, roll out the dough until it is ½ inch thick and cut it into desired shapes with a knife. Once you have achieved your desired shapes, poke holes into each tinderbread using a fork to stop them from puffing.
Step 4: Bake the Tinderbread
Arrange the tinderbread pieces in a baking tray and bake them in the oven for about 30 minutes on each side. Additionally, if you’re using a wood stove, place the biscuits onto a cast-iron skillet and cook them for 40 minutes on each side. While this baking time is merely a rough estimate, you can continue baking them until the tinderbread dries out completely.
Step 5: Storage
Once the tinderbread is baked, have it cool down in natural air. When completely cooled, you can then store them in airtight containers or ziplock bags.
➡️ How to Stockpile 272 pounds of long-lasting food with just $5
How to Store Tinderbread So It Lasts for Years
Back in the Great Depression, when folks had to make every bite count, preservation wasn’t just a skill—it was survival. Tinderbread earned its place in pantries because it could outlast nearly everything else. And if you’re making a batch today, you’ll want to be just as sure it stays safe and ready when you need it most.
Here’s how to store tinderbread the right way—just like our grandparents did, and maybe even better.

Cool It Completely First
After baking, don’t rush to stash it away. Let each piece of tinderbread cool fully—ideally on a wire rack with good airflow. Storing it warm will trap moisture and invite mold, which defeats the whole purpose.
Go Airtight
Old-timers used to seal theirs in metal biscuit tins, wrapped in cloth or wax paper. Today, you can use mason jars, vacuum-sealed bags, or even Mylar pouches with oxygen absorbers. The key is keeping air and humidity out.
Keep It Dry and Dark
Tinderbread stores best in a cool, dry place—think root cellar, pantry shelf, or even tucked away in a cabinet. Avoid anywhere with heat, light, or changing temperatures. A dark, stable environment helps keep the biscuits dry and mold-free for years.
Label and Rotate
Yes, it lasts for years—but it’s still smart to label the batch date and use the oldest first. Make it part of your pantry rotation like you would with beans, grains, or jerky.
Long-Term Storage Tip: Bake Twice
For even better shelf life, some old homesteaders would bake their tinderbread a second time on a lower heat after it cooled—kind of like hardtack rusks. This pulled out the last bit of moisture and made them even more fireproof and mold-resistant.
If you want to learn how to preserve food for decades for the pennies on the dollar, all you need to do is learn from the only people who have been living without electricity, toxin-ridden foods and modern conveniences for all their life. Here, you’ll get access to several never-before-seen videos where you can see:
- The deadly canning mistake the Amish never make (but most Americans do… without even realizing it)
- Why the Amish put this single leaf in their flour
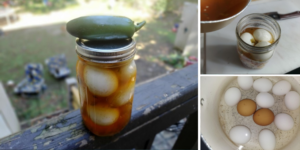
- How they make powdered eggs
- How they store eggs for over a year—without a fridge, vacuum sealer, or added chemicals
And that’s barely scratching the surface of what these videos will reveal. They’re made by a former Amish who has been excommunicated for sharing these secrets with the outside world. And there is a limited number of spots available, so grab yours while you still can!

Homesteading Uses for Tinderbread Beyond the Table
Most folks think of tinderbread as just a backup food—but on the homestead, it can be more than that. If you’ve got a stockpile of these rock-hard biscuits, here are a few smart and resourceful ways to put them to work.
1. Grind It Into Survival Flour
Once tinderbread has fully dried and hardened, it can be crushed into a coarse powder using a mortar and pestle or grain mill. That powder stores just as well and can be added to stretch pancake batter, thicken stews, or even mix into cornmeal mush when supplies run low.
2. Use It as Emergency Chicken Feed
Pulverized tinderbread makes a decent short-term feed extender for chickens when you’re in a pinch. Soak it in warm water or whey to soften it, then mix it with veggie scraps, cracked corn, or kitchen leavings.
3. Make Tinderbread Coffee
Yes, it’s a thing. Some pioneers would steep broken pieces in boiling water to make a kind of grainy, roasted beverage when actual coffee ran out. Add a pinch of salt or cinnamon if you like a bit more flavor—it won’t replace your morning cup, but it’ll warm you up.
4. Toss It in the Smokehouse
Hanging a few biscuits near your cured meats helps absorb moisture and adds a touch of smoky flavor. Later, you can grind them and use the crumbs to season savory pies or fry up with lard for a smoky pan dressing.
5. Barter or Gift
If you’ve got more tinderbread than you know what to do with, wrap up a few pieces in wax paper and tuck them into trade baskets. Other homesteaders may gladly accept them in exchange for eggs, seeds, or even homemade soap.
Inside A Navy SEAL’s Bug-In Guide, you will discover exactly how to build a long-lasting stockpile that needs no refrigeration. It starts with a complete stockpile that you can eat from morning, lunch, and dinner for three months. Then you’ll have another one for six months and another for a full year.
You’ll see exactly where to buy these foods so they’re as affordable as possible. You’re also going to get a day-by-day and meal-by-meal rationing plan to make sure you are not only getting around 2,200 calories a day but also the vital protein, fat, and other nutrients that will keep you healthy in the long run.
Besides what I’ve mentioned so far, here are some other things you’ll find inside:
- The Under $1 Walmart Canned Goods You Absolutely Need to Add to Your Food Reserves
- A Meal in a Jar That Can Feed You for a Week
- How to Make the Ultimate Survival Food with a 25-Year Shelf Life
- The Only Seeds You Need to Stockpile for a Crisis
- What Item You Should Remove from Your Pantry Immediately
- How to Hide That You Still Have Power Left in a Blackout
- What Great Depression Foods We’ll Be Eating Again Soon
- How to Use a Car Battery to Power Up Your Radios
- What Happens if You Take Expired Medications
And so much more!
The author has printed only a limited batch of copies this time, and once they’re gone, they’re gone for good. You can access my personal discount from the button below!

Final Words
To sum it up, tinderbread might not be that delicious or savoury staple you may find on your homestead. Nevertheless, it can be an amazing backup when the bread isn’t available and you’re craving a quick and healthy snack. So, what are you waiting for? Roll up your sleeves and bake a delicious batch of tinderbread now.
You may also like:
How The Amish Keep Their Food From Rotting For Months (Video)
How to Make Cowboy Bread (Lasts Months in Your Pantry)
What Went Wrong With Your Bread?
Corn Pone – The Pioneers Bread


