Life on the homestead’s like a box of chocolates—you never know what you’re gonna get. Between wrangling livestock and tackling DIY projects it’s a miracle we make it through a week unscathed.
Now, I’m no doomsday prepper, but I’ve learned the hard way that a little preparation goes a long way. My wife and I take a “less is more” approach to farmyard first aid, but we’re always ready to patch ourselves up when things go sideways.
Essential First Aid Skills for Homesteaders
First up we have:
Wound Care
As homesteaders, we’re no strangers to cuts, scrapes, and the occasional more serious injury. Knowing how to properly clean and dress a wound is essential.
Understanding the type of wound you’re dealing with is also crucial for proper treatment. Here’s a quick reference table to help you identify and respond to different wound types:
Wound Type | Description | Initial Treatment | When to Seek Medical Help |
Abrasion | Superficial scraping of the skin | Clean with soap and water, apply antibiotic ointment | If signs of infection appear |
Laceration | Deep cut or tear in the skin | Apply direct pressure to stop bleeding, clean thoroughly | If deep, gaping, or won't stop bleeding |
Puncture | Narrow, deep wound from pointed object | Clean thoroughly, monitor closely for infection | If deep, caused by rusty object, or animal bite |
Avulsion | Portion of skin torn away | Cover with moist sterile dressing, seek medical help | Always seek medical attention |
Burn | Tissue damage from heat, chemicals, etc. | Cool with water, cover with clean dry dressing | For 2nd degree (blistering) or 3rd degree burns |
Proper Wound Care Technique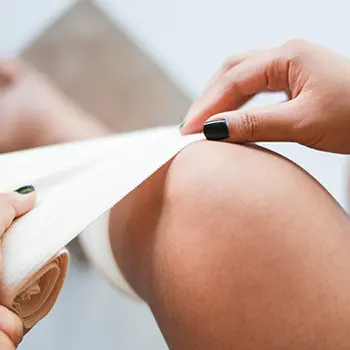
Regardless of the wound type, follow these steps for basic wound care.
First, stop the bleeding by applying direct pressure with a clean cloth or sterile gauze. Once the bleeding is controlled, clean the wound thoroughly by irrigating it with clean water or saline solution to remove debris. If there are any visible foreign objects, sterilized tweezers are used to remove them carefully.
Next, disinfect the wound by applying an antiseptic solution like povidone-iodine or hydrogen peroxide. After disinfecting, dress the wound appropriately. For minor wounds, apply an antibiotic ointment and cover it with an adhesive bandage. For larger wounds, use non-stick sterile pads and secure them with medical tape or an elastic bandage.
Finally, monitor the wound for signs of infection, such as increased redness, swelling, warmth, or pus.
When to Seek Professional Help
While many wounds can be treated at home, some require immediate medical attention like deep puncture wounds, wounds that won’t stop bleeding after 10-15 minutes of direct pressure, large or gaping wounds that may need stitches, and any wound showing signs of infection.
In my years of homesteading, I’ve found that being prepared for these common injuries has saved us countless trips to the emergency room and allowed us to handle most situations right here on our property.
Bleeding Control
Severe bleeding can be life-threatening if not addressed quickly. Here’s how to handle it.
First, apply direct pressure to the wound using a clean cloth or sterile gauze and press firmly to control the bleeding. If possible, elevate the injured area above the heart to help slow the blood flow. If blood soaks through the initial dressing, add more layers of cloth or gauze without removing the original one.
For limb wounds, you can use pressure points to further control bleeding. Apply pressure to the brachial artery (inner arm) or femoral artery (groin) to slow the blood flow. If the bleeding is severe and other methods are ineffective, use a tourniquet as a last resort. Apply it between the wound and the heart, and be sure to mark the time it was applied. A tourniquet should not be left on for more than 2 hours.
Related: Survival Skills You Should Learn From The Amish
Recognizing and Treating Shock
Severe bleeding can lead to shock, a life-threatening condition. Signs of shock include pale, cool, clammy skin, rapid and shallow breathing, a weak and rapid pulse, and confusion or loss of consciousness.
To treat shock, lay the person flat on their back and elevate their feet about 12 inches to improve blood flow to vital organs. Keep them warm with blankets, but do not give them anything to eat or drink. Seek immediate medical help to address the underlying cause and provide advanced care.
Burn Treatment
Burns are a common homesteading hazard, whether from the kitchen, workshop, or a bonfire gone wrong. Quick, appropriate action is crucial.
Types of Burns
- First-degree burns: Affect only the outer layer of skin. The skin is red and painful but doesn’t blister.
- Second-degree burns: Involve the first two layers of skin. They cause redness, swelling, and blistering.
- Third-degree burns: Damage extends to deeper tissues. The burnt area may appear white, black, or charred.
Immediate Burn Care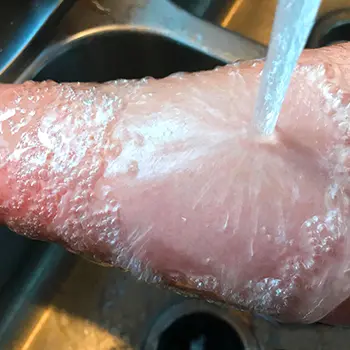
To stop the burning process, remove the person from the heat source immediately. For chemical burns, flush the area with water for at least 20 minutes to remove the chemicals.
Cool the burn by running cool (not cold) water over it for at least 10 minutes. Avoid using ice, as it can cause further damage. Carefully remove any restrictive items, such as clothing or jewelry, near the burnt area to prevent further irritation.
Cover the burn with a clean, dry dressing or cloth. Do not apply butter, oils, or creams, as these can trap heat and cause infection. Over-the-counter pain relievers can help manage discomfort.
When to Seek Medical Help
Seek immediate medical attention for any third-degree burns, large second-degree burns, burns on the face, hands, feet, or genitals, burns that encircle a limb or the body, and signs of infection (increased pain, redness, swelling).
Related: These Items Disappear First In A Crisis
Fracture and Sprain Management
Whether it’s from a fall from a ladder or a mishap with livestock, broken bones and sprains are a real risk on the homestead.
Recognizing Fractures and Sprains
Fracture signs include severe pain, swelling and bruising, deformity or abnormal positioning, inability to bear weight (for leg injuries), and a grinding or grating sensation with movement.
Sprain signs involve pain and tenderness, swelling, bruising, limited flexibility, and difficulty using the joint.
First Aid for Fractures and Sprains
- Rest: Stop using the injured area immediately.
- Immobilize: For suspected fractures, splint the joint above and below the injury. For sprains, use an elastic bandage to provide support.
- Ice: Apply cold packs for 20 minutes at a time to reduce swelling.
- Elevate: Raise the injured area above heart level if possible.
When to Seek Medical Help
Always seek medical attention for suspected fractures.
For sprains, see a doctor if you can’t bear weight on the injured area, the joint feels unstable, there’s significant swelling or bruising, or pain and swelling don’t improve after a few days of home treatment.
Choking
Choking can happen to anyone, at any time. Knowing how to respond quickly can save a life.
The Heimlich Maneuver for Adults and Children
- Stand behind the person and wrap your arms around their waist.
- Make a fist with one hand and place it just above their navel.
- Grasp your fist with your other hand and give quick, upward thrusts into their abdomen.
- Repeat until the object is expelled or the person becomes unconscious.
Back Blows for Infants
- Hold the infant face down on your forearm, supporting their head.
- Give five quick blows between the shoulder blades with the heel of your hand.
- If unsuccessful, turn the infant over and give five chest thrusts.
- Alternate between back blows and chest thrusts until the object is expelled or the infant becomes unconscious.
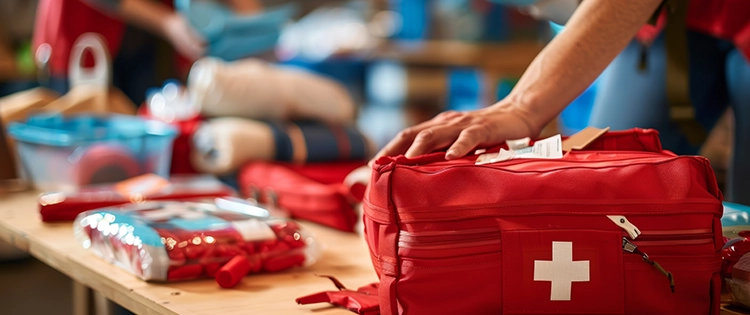
Building Your First Aid Kit
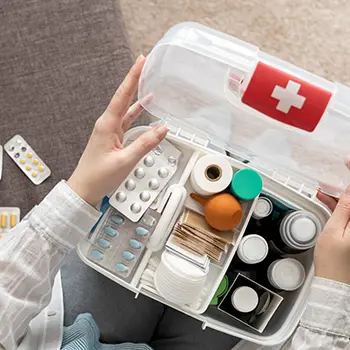
A well-stocked first aid kit isn’t just a box of bandages – it’s your lifeline in an emergency.
As homesteaders, we face unique risks that city dwellers don’t encounter. From animal bites to machinery accidents, we need to be prepared for it all.
Essential Items Every Homesteader’s First Aid Kit Should Contain
Here’s a comprehensive list of must-have items for your homestead:
- Wound care supplies: sterile gauze pads in various sizes (2×2 inch, 3×3 inch, 4×4 inch), adhesive bandages of different sizes, medical tape, elastic bandage wraps (ACE bandages), triangular bandages, and non-stick sterile pads.
- Antiseptics and wound treatment: hydrogen peroxide, rubbing alcohol, povidone-iodine solution, antibiotic ointment, 1% hydrocortisone cream, and burn gel or cream.
- Medications:
- Acetaminophen
- Ibuprofen
- Aspirin (for potential heart attacks)/
- Antihistamines
- Anti-diarrheal medication
- Oral rehydration salts
Essential tools and equipment include scissors (preferably trauma shears), tweezers, safety pins, disposable gloves (non-latex), instant cold packs, hot packs, a flashlight with extra batteries, an emergency (space) blanket, and a magnifying glass for splinter removal.
Basic medical equipment includes a digital thermometer, a blood pressure cuff, and a stethoscope (if you’re familiar with its use).
When Disaster Strikes
Remember, these skills are just the beginning. Regular practice and ongoing education are key to being truly prepared for any emergencies
Here’s the thing about homestead accidents—they don’t wait for convenient times. Whatever you’re gonna be faced with, know that you’re the first line of defense.
Stay calm, assess the situation, and don’t be afraid to holler for help if you need it.
You may also like:
Stop Spending Money At The Pharmacy By Growing These 10 Plants (Video)
Survival Hacks From The Civil War That Are More Useful Than Ever
11 Must-Have Items for Your Wilderness Survival Shelter


Overall, you’ve provided a much needed and well-written article; however, I want to raise a few issues from a disaster preparedness stand point. In particular, your article covers many of the most relevant emergency medical treatment points from everyday life on the homestead; but your medical supply list was woefully inadequate to cover major trauma that can easily occur on any given day – with or without a major disaster (natural or human caused) affecting your homestead and the local community. That said, EVERY home should have adequate supplies to provide lifesaving intervention to manage trauma up to and including a major disaster – whether you classify yourself as “doomsday prepper,” or not. I base this on my training as a PADI Rescue Diver and as a former Service Member certified in Tactical Combat Casualty Care (TCCC). Many of the skills I’ve learned translate very well to other trauma care events, even if you’re not scuba diving or engaged in combat operations. Because of my training, I’m prepared to manage severe wounds and injuries from farm implements, traffic accidents, natural disasters, etc.
Michael B covered the most essential aspects of care: Wound Care; Bleeding Control; Recognizing and Treating for Shock; Burn Treatment; Fracture and Sprain Management; Choking (and Airway Management). Unfortunately, his medical supply list falls short. A well accoutered first aid kit requires more than those he mentioned if you want to be prepared for when disaster strikes. Most notably, Michael B doesn’t mention or only vaguely alludes to critical components necessary for lifesaving intervention. These components are essential to buy time for a patient before we can seek professional medical intervention. Michael’s article appears to assume that professional medical intervention may be easy to reach in less than an hour. This may prove a safe assumption in 60-70% of cases, but for a little more effort, we can expand our preparedness to 85% or even 90% of potential cases and buy your patient hours – or even days – where professional medical intervention is NOT readily available. There are some times when a “less is more” approach can get one killed, where a little extra investment in preparation could prevent a needless loss of life.
For example, stemming major blood loss in seconds may mean the difference between life and death when dealing with a traumatic injury – including a compound fracture. You cannot effectively stop major bleeding with a handful of sterile gauze pads and adhesive bandages. In the event of major bleeding, especially arterial bleeding, will require one or more tourniquets, applied high up between the wound and the heart and tight enough to constrict the blood flow. For this, most professionals recommend having a Combat Application Tourniquet (CAT). It is easy to apply and combat-proven to be highly reliable. CATs run about $30 a piece and are well worth it. Make sure you get a Military-Specification (MIL-SPEC) version, as there are lots of cheap copies that may fail when you need them most. Sure, you can use a trouser belt or a hank of fabric with a stick for a windlass for a field expedient tourniquet, but why not have the real thing handy rather than relying on items that were not designed for it as your primary measure.
In addition to tourniquet, no kit for bleeding control is complete without rolled gauze, “QuikClot” Combat Gauze and powder, and Trauma Bandages. One can pack a severe wound with rolled gauze to help stem bleeding. “QuikClot” Combat Gauze and Powder products have an agent that speeds up natural clotting and stops bleeding within minutes. One can apply these in conjunction with rolled gauze and/or tourniquets (especially with wounds not on an extremity, such as a torso wound or head wound). Trauma Bandages – such as the Israeli Bandage – are useful for dressing wounds as the last level of wound and bleeding control. The Israeli Emergency Bandage may be used as a standard or a pressure bandage, depending on the needs of the moment.
When it comes to Wound Care, a thoracic trauma might include a puncture of a lung — an open pneumothorax or a “sucking chest wound – which can very quickly devolve into a life-threatening event that no Band-Aid or gauze pad can prevent. In this case, a decent first aid kit will have a minimum of two chest seals, an occlusive dressing designed specifically to treat chest wounds that could cause a pneumothorax. One applies chest seals to close the leak and prevent a collapsed lung. Additionally, (if one has the training) I recommend a 14-gauge needle to deal with a tension pneumothorax, wherein a large air collection in the pleural space compromises respiration and cardiac function. This can kill an injured person with an open pneumothorax in a matter of minutes, unless the aid provider can release the pressure with the needle. This is a simple procedure that any non-medical person can learn and practice in an hour with the right instructor.
Michael B mentioned the need for splinting fractures and sprains, but did not include splints in his medical kit list. Every kit should include a few SAM Splints, a formable splint one can adapt to immobilize most of these mechanical injuries. Keep some finger splints or large tongue depressors to splint fingers, as well.
When it comes to breathing and airway management, being able to complete a Heimlich Maneuver and a finger sweep barely scratches the surface of emergency situations where opening and maintaining a viable airway can mean the difference between life and death. Again, there are additional items one may add to their kit for a small, lifesaving investment. For choking, knowing how to complete the Heimlich Maneuver is good, but there is now a device know as “Lifevac” that does a better job of removing foreign objects from a patient’s airway. Additionally, there are traumatic injuries that may compromise a person’s airway. In these cases, a nasopharyngeal airway (NPA), also known as a nasal trumpet or nose hose, is used to keep a patient’s airway open by inserting it through their nose and into their throat. Again, it doesn’t take a medical degree to use an NPA effectively.
The additional items mentioned cost about $30 or under, a piece. You can purchase these gradually, one or two items at a time to ensure your kit is ready. Most of these items won’t expire or may be used in a pinch after their posted expiration date if properly stored. Moreover, you don’t have to be Emergency Medical Technician (EMT) qualified or a licensed medical professional to use them effectively to save a life and buy time for professional medical intervention. There are other lifesaving items one might keep on hand for medical trauma. If you are willing to go the extra mile, you can add an easy-to-use Automated External Defibrillator (AED) for less than $500 help people who are experiencing sudden cardiac arrest (SCA). While some may say that chest compressions as part of cardiopulmonary resuscitation (CPR) are “good enough,” CPR is designed merely to keep blood flow and oxygen traveling to the brain until medical professionals can intervene…usually with an external defibrillator. So, why not invest in having an affordable AED and increase the chances of a patient’s survival, especially when the average funeral costs between $7,000 and $12,000?
One critical point Michael B failed to mention is training and practice. Even if you don’t go all in on the recommended items I’ve added to the list, you may be of no help at all if you don’t know how to use the items Michael B and I have provided if you don’t train and practice with them. YouTube and first aid handbooks are a decent place to start, if you’re on a tight budget. Most any half-educated intervention is better than none, but I would encourage you to seek additional training through a professional outlet. The American Red Cross offers training and certification on CPR and the use of AEDs, as well as other first aid training and certification. If you can afford to go the extra mile, I highly recommend civilian-equivalent TCCC or Tactical Emergency Casualty Care (TECC) training and certification through any number of reputable vendors (search for these online). With a few hundred dollars and around 60-hours of training, you will have the confidence to deal with most traumatic injuries and by precious time to ensure an injured person receives lifesaving intervention.